Hello, folks! Life has been crazy busy, and isn't about to slow down anytime soon... but hopefully my day job will wind down in the next month or so, and I will have more time for my personal projects!
Some of those projects include you guys! I really want to get down some patterns that I've been working on, as well as a few more tutorials for YouTube - I can't wait to share them with you guys! I've also started using Periscope, and I really like it! Right now it's just WIP updates, but I also hope to provide help and tips, too, so keep and eye out!
In the meantime, I've been dreaming up a learn-to-knit series, using wash cloths to build skills. I will be doing washcloths because they are small, quick, and useful. Because they complete quickly, the new knitter will be able to move on to their own projects sooner than if they learned on a scarf or cowl. I would love to teach the series in person, but I will probably do it through YouTube, first, and see where it goes from there.
Showing posts with label tutorial. Show all posts
Thursday, September 24, 2015
Sunday, December 14, 2014
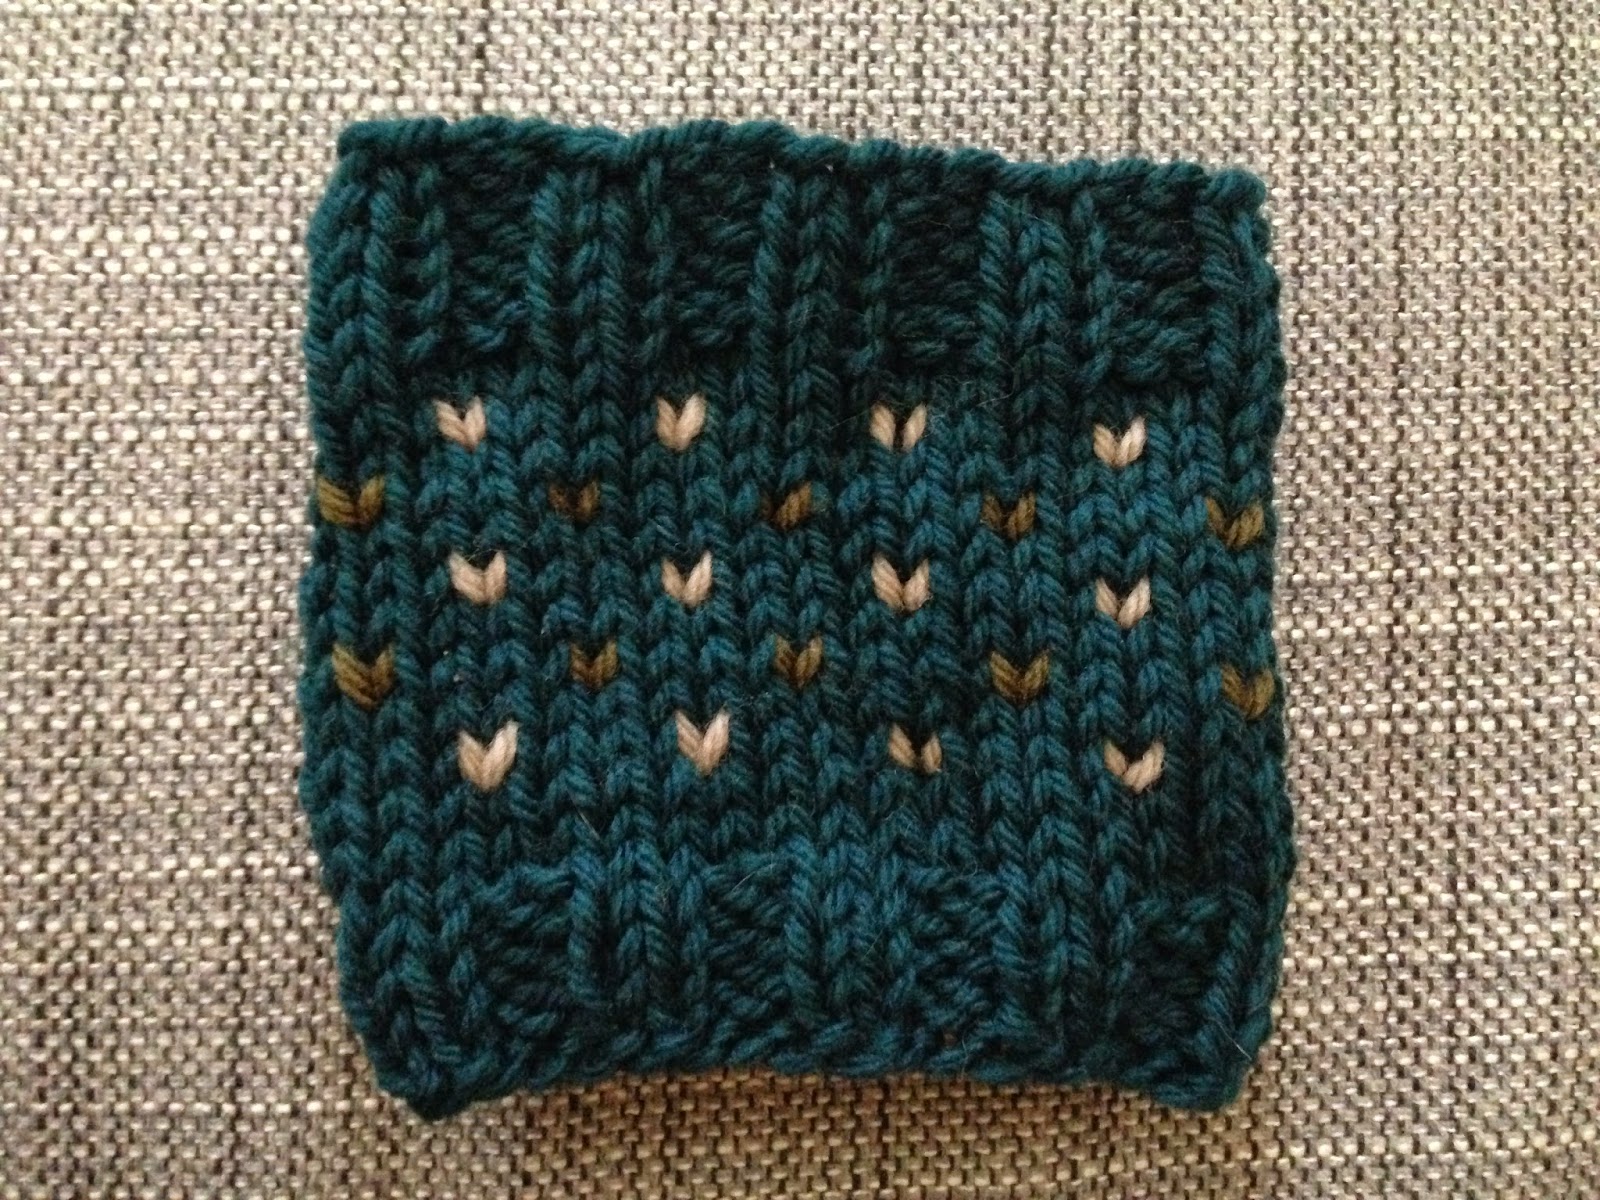
Pattern | Simple Cup Cozy (and color work)
A while back I posted the pattern and tutorial for my Dimple Stripe Cup Cozy. Earlier this year I started to make more basic cup cozies so that they could be modified with embroidery and color work, and be a bit less feminine. I've been walking around with my first one (not pictured) for a while now, and this weekend I got stopped by two women that wanted to know how to make it - this was a sign that it's time to update the blog with this particular pattern. So here it is, another free cup cozy pattern and tutorial!
| I love how the knitted 'v' looks like a heart |
These make really great little gifts, and are also great stash busters! They fit on regular coffee shop cups, as well as slim personal cups and travel mugs.
Friday, November 28, 2014
Pattern | Knitted Simple Slouchy Hat
Last year I posted my free pattern for a crocheted Simple Slouchy Beanie. Since then, I have been playing around with knitting and wanted to offer another simple project, a knitted slouchy hat.
Though I learned how to knit over ten years ago, I stuck with very basic stuff because knitting in the round scared me... DPNs and circular needles can be intimidating. But, I plowed through that fear and plunged into hat making, and I am so glad that I did!
| S/M hat on the left, and M/L hat on the right. |
Labels:
beanie,
beginner,
beginner knitting,
free pattern,
hat,
knitting,
learn to knit,
pattern,
slouchy beanie,
slouchy hat,
tutorial
Friday, November 21, 2014
Mini Tuto and Pattern | Knitted Seed Stitch Cowl (with video!)
Sometimes the really simple things are the best. I recently cast on this seed stitch cowl, and I love the way it's working up! Seed stitch cowls are very easy to make. This one is in the round, which makes it even easier, and it requires only one 100g* ball of yarn!
I'm about half way through the project right now - I've been alternating between this and two hats on the train ride to and from work - and it seems like it will be just right when it's done.
This project is great for a beginner! You just need to know how to knit and purl - working in the round is fairly easy, and there are plenty of YouTube tutorials to help you start off right. At the bottom of this post I have my own little video for seed stitch in the round!
Labels:
beginner,
free pattern,
knitting,
learn to knit,
pattern,
seed stitch,
simple,
tutorial
Sunday, November 9, 2014
Projects, Projects, and More Projects
Well, I have plenty to keep me occupied until 2015. I've been getting back into knitting and I just want to make everything! After successfully making a lacy cowl, I decided to try open work in a hat (since I've also been obsessed with making hats). I'm excited to see how the decreasing goes, as the lace continues to the end.
The pattern I picked is the Greyhaven Hat, by Robin Ulrich. I love how the lace still feels modern, and how the pattern is simple enough that it would still look lovely with a yarn that has some color variation.
Saturday, November 1, 2014
Revisiting the Yarn Over (YO)
I recently started working on a beautiful, open-work cowl. The pattern is called A Nobel Cowl, by Emily Kausalik, and is published for free on Ravelry. It has the most beautiful shield pattern, and I knew it would be perfect for the the Classic Elite Lush that I had picked up over at Article Pract (which is sadly closing within the year). It also looked fairly easy to make, though it was marked intermediate*.
I knew (or thought I knew) how to do most of the stitches, and just went to YouTube to learn how to ssk, or slip-slip-knit, a decrease stitch. I was confident enough in my ability to perform the k2tog and yo to get started without much hesitation.
The pattern states that it is in sets of fifteen. Having only one skein of yarn, I decided to reduce the number of stitches to 105, and make mine a bit shorter. I got started, but noticed that I was working in sets of nineteen, and that by the time I made it to the end, I was only able to get ten of the last set of "fifteen" in... I reached out (kind of... more like complained on Instagram), and was told that the pattern was indeed worked in sets of fifteen stitches, not the nineteen that I was getting. I was completely perplexed, but just kept going for the full twenty-eight rows of the pattern, only to see this mutant looking merger where the whole patter meets half a pattern. You can imagine my disappointment, confusion, and frustration.
Labels:
beginner,
free pattern,
howto,
Ravelry,
tutorial
Tuesday, June 3, 2014
Diagonal Baby Blanket, and How To Do a Yarn Over
When I first started knitting I would scour the Lion Brand free patters, because it was pretty much the only brand of yarn I was familiar with and liked, and I didn't know about Ravelry yet. I had found this Diagonal Baby Blanket pattern, which is pretty and simple, but I was intimidated by the yarn over, and just couldn't get it. I was also intimidated by the thought of using circular needles. I guess I was a wimp… And really, I had no reason to be afraid; this is a beginner pattern, and a great way to learn how to make a yarn over, and work diagonally.
Anyway, I recently saw a few pictures of diagonal knit blankets, remembered the pattern, and decided to give it a try. I haven't finished it yet, but I will give you my notes so far, as well as a little video (my first knitting video!) on how to do a yarn over in the knit stitch.
Though this project would be great in a cozy merino wool, I am using Wool-Ease Worsted, because it's affordable in bulk, and machine washable. I found a pretty, neutral grey, which is great for any age or gender. I was able to get six skeins in the same dye-lot, and it seems this thing will probably come out to be about 32"-36". We will see.
Pattern Notes
I don't really like the way this pattern starts out. It's a bit skimpy, going almost immediately into the yarn over (yo) "eyelet," which just looks weird and won't match the other corners very well. So I changed it, twice.
| Version 1 (the blanket I'm working, now) and Version 2 |
The pattern says to cast on five stitches, and then go into the yarn overs in row 2.
Labels:
baby blanket,
blanket,
free pattern,
gifts,
handmade,
how-to,
Knit,
knitting,
pattern,
tutorial,
tutorial tuesday,
Wool-Ease,
working yarns,
yarn
Thursday, March 28, 2013
Tutorial Thursday: Spring Cleaning Scrubby
Hello! Welcome to Tutorial
So to start with, you can clean out the stash AND clean the house with these lovely scrubbies! One in knit, the other in crochet, depending on your preference. Now you have an excuse to go for the yarn stash before scrubbing!
Labels:
beginner,
charity,
crochet,
crocheting,
diy,
free,
gift,
how-to,
Knit,
knitting,
pattern,
seed stitch,
simple,
spring cleaning,
themadewithloveproject,
tutorial,
tutorial tuesday,
tutorials,
yarn,
yarn stash
Tuesday, March 19, 2013
Tutorial Tuesday: "Swiss Dot"
I really love seed stitch, but depending on the yarn, sometimes it can be a bit much. I wanted a dotted look, but less compressed... Now, I have been playing around with patterns quite a bit, and after doing the striped cup cozy I thought I would apply the same method with dots.
What I came up with were two Swiss dot inspired patterns:
"Swiss Dot" No. 1 is a bit of a closer dot and works well for smaller items, like cozies.
"Swiss Dot" No.2 is a bit more spread out and subtle, and good for scarves or blankets.
Below are both "diagram" patters, as well as written patters, for each.
Tuesday, March 5, 2013
Tuetorial Tuesday: Simple Slouchy Beanie
It's been a while since I have posted a tutorial, and I had recently promised one on a seed-stitch cup cozy. Well, I used that cozy today and it was too big for a standard paper coffee cup. It fit around, but it would slide, and eventually stretched a bit and fell off when I set the cup down... So, I finished this post instead, which has been pending and unfinished for a while now...
Some of you may remember my post on Instagram several weeks ago with a beanie pattern I came up with. I was inspired by this video on making your joining stitches in double-crochet in the round nearly invisible - I was quite interested in this as I had just made a number of beanies for Christmas and was not really pleased with the gap at joining. So, here is the result of my experiment:
The Simple Slouchy Beanie uses double crochet, single crochet, and slip stitch, in the round. There are increases and decreases, but nothing fancy.
Labels:
basic beanie,
beanie,
beginner,
crochet,
crocheting,
diy,
double crochet,
instagram,
pattern,
simple,
tutorial,
tutorial tuesday,
tutorials,
yarn
Tuesday, December 18, 2012
Tutorial Tuesday: a man hat
Hello! It's been ages since I posted anything...
Well, I survived finals, and now I am busy making hats for the (little) men in my life.
I scoured the internet for visor hat patterns for my nephews and this is the one that I decided to go with.
It is the Streetwise Hat pattern from Red Heart Yarn - it's a free pattern on their website. I sized it down a bit for my nephews, or I should say nephew, because I have only completed the hat portion of one so far. I wanted something that was a little more interesting than just single crochet hat, but also something that would be simple to make.
You can follow the hat-making process on Instagram if you like - @themadewithloveproject
I am starting another cap too, a knitted one, but that one is top secret until after Christmas...
Happy crafting!
Stephanie
MWLP
Well, I survived finals, and now I am busy making hats for the (little) men in my life.
I scoured the internet for visor hat patterns for my nephews and this is the one that I decided to go with.
![]() |
| Photo from www.redheart.com |
It is the Streetwise Hat pattern from Red Heart Yarn - it's a free pattern on their website. I sized it down a bit for my nephews, or I should say nephew, because I have only completed the hat portion of one so far. I wanted something that was a little more interesting than just single crochet hat, but also something that would be simple to make.
You can follow the hat-making process on Instagram if you like - @themadewithloveproject
I am starting another cap too, a knitted one, but that one is top secret until after Christmas...
Happy crafting!
Stephanie
MWLP
Tuesday, November 20, 2012
Tutorial Tuesday: Crochet Bow Headband / Ear Warmer
Searching through various blogs for cowl patterns a couple of weeks ago I stumbled on this cute headband. I decided to try my hand at one with the leftovers from the navy cowl I just made (you might have seen the pictures on Instagram). I think that this will be a great gift for one of my sisters - I won't say which (I have three).
I found the free pattern and tutorial on People Webs blog, right here.
She includes detailed instructions and step-by-step photos for you, which I think is great!
This is another great project for a beginner because it is all single crochet! This makes it a nice relaxing project too because it doesn't require a ton of concentration or counting... I have been making mine while I ride the bus.
This could also be done in a knit version using either garter or seed stitch...
I am going about mine a little bit differently - rather than working the length of the piece, I am working the width. When I make a second one I will work the length instead, and then let you know what I think of the two methods... My reason for working the opposite way is that I am not sure about the suggested length and want to make sure that it will be the right size. But, like I said, we will see how it turns out.
If you don't want to make your own, she does sell them on her Etsy shop!
Be sure to check out her blog and shop - she has a ton of great stuff!
I found the free pattern and tutorial on People Webs blog, right here.
![]() |
| Photo from peoplewebs.blogspot.com |
She includes detailed instructions and step-by-step photos for you, which I think is great!
This is another great project for a beginner because it is all single crochet! This makes it a nice relaxing project too because it doesn't require a ton of concentration or counting... I have been making mine while I ride the bus.
This could also be done in a knit version using either garter or seed stitch...
I am going about mine a little bit differently - rather than working the length of the piece, I am working the width. When I make a second one I will work the length instead, and then let you know what I think of the two methods... My reason for working the opposite way is that I am not sure about the suggested length and want to make sure that it will be the right size. But, like I said, we will see how it turns out.
If you don't want to make your own, she does sell them on her Etsy shop!
Be sure to check out her blog and shop - she has a ton of great stuff!
Tuesday, November 13, 2012
Tutorial Tuesday: the simple cowl
I am proud to offer you an original pattern and tutorial this week!
It turns out that I have become rather hooked on crochet! I ended up watching a number of tutorials on YouTube recently and I got inspired to try my hand at making a cowl.
To get an idea for size I wrapped one of my scarves around my neck to see how long I would like it. Then I took it off and grabbed my measuring tape - it was somewhere in the area of 30"-36". As I was making the chain I checked the length along the way by wrapping it around my neck. I started off with a 6.5mm hook and two strands of worsted weight yarn, but it was much too stiff! So, I unraveled, scoured the internet for other cowl patterns and found that a 10mm hook is ideal when using two strands of yarn, and I happened to have a 10mm hook on hand! So I started up again and it turned out great!
The pattern uses the following stitches:
SS (slip stitch)
SC (single crochet)
HDC (half double crochet)
DC (double crochet)
Matterials*:
1 skein* of Loops & Threads Impeccable yarn (Michael's brand)
(note: I just made this with Caron Simply Soft and I love it!)
1 10mm crochet hook
1 stitch marker*
1 large-eye yarn needle
Tape measure
Scissors
Method:
Using two strands of yarn at the same time, the outside and inside strands, make a chain that is approx. 32" (or desired length) and join with a SS, taking care not to twist your chain.
Row 1. SC into each chain, marking the final stitch with your stitch marker.
Row 2. Chain one (don't turn, you are working in the round) and HDC for the entire row. Mark your final stitch. SS to join to the beginning of your row.
Row 3. Chain 2 and DC into every stitch. Mark your final stitch. SS to join to the beginning of your row.
Row 4. Chain 1 and HDC into every stitch. Mark your final stitch. SS to join to the beginning of your row.
Row 5. Same as 3
Rows 6-10. Continue alternating between HDC and DC, as in the rows 4 (HDC) and 3 (DC), ending with the HDC.
Row 11. SC into each stitch, marking your final stitch. You will not need to "join."
Row 12. SS into each stitch around, taking care not to make the stitches too tight. Bind off, leaving a tail, pull tight and sew in the tail.
Tighten the tail from the slip knot where you began and sew in the tail.
Your finished product should be about 18" flat, 36" around, and about 7" tall.
* 1 skein refers to the solid color ball with 277 yards of yarn - other styles of Impeccable have fewer yards of yarn. If you us a different yarn you might need more than one skein (i.e. Vanna's Choice is only 145 yds., so you would need two skeins). UPDATE: I just made a cowl with Caron Simply Soft and I LOVE IT - it has such a nice weight to it, and the yarn is set up for pulling from the outside and the inside for convenience. It also has more yardage than Impeccable, so you can make the cowl a bit taller if you like. For a stitch marker I typically use a paperclip, but in the pictures above I just used a strand from the tail. You can use a piece of yarn in a different color, a safety pin... whatever you have.
You could also make this 60"+ so that you can wrap it twice. And you might want to try stacking stitches rather than doing every-other, or throw in some single-crochets, or maybe even the treble stitch. Have fun with it!
If you have any questions regarding the pattern, please leave a comment or send me an email at TheMadeWithLoveProject {at} gmail {dot} com.
If you try this pattern I would love to see the pictures! Tag me on Instagram or share a link in the comments. Thanks!
Enjoy!
It turns out that I have become rather hooked on crochet! I ended up watching a number of tutorials on YouTube recently and I got inspired to try my hand at making a cowl.
To get an idea for size I wrapped one of my scarves around my neck to see how long I would like it. Then I took it off and grabbed my measuring tape - it was somewhere in the area of 30"-36". As I was making the chain I checked the length along the way by wrapping it around my neck. I started off with a 6.5mm hook and two strands of worsted weight yarn, but it was much too stiff! So, I unraveled, scoured the internet for other cowl patterns and found that a 10mm hook is ideal when using two strands of yarn, and I happened to have a 10mm hook on hand! So I started up again and it turned out great!
The pattern uses the following stitches:
SS (slip stitch)
SC (single crochet)
HDC (half double crochet)
DC (double crochet)
Matterials*:
1 skein* of Loops & Threads Impeccable yarn (Michael's brand)
(note: I just made this with Caron Simply Soft and I love it!)
1 10mm crochet hook
1 stitch marker*
1 large-eye yarn needle
Tape measure
Scissors
Method:
Row 1. SC into each chain, marking the final stitch with your stitch marker.
Row 2. Chain one (don't turn, you are working in the round) and HDC for the entire row. Mark your final stitch. SS to join to the beginning of your row.
Row 3. Chain 2 and DC into every stitch. Mark your final stitch. SS to join to the beginning of your row.
Row 4. Chain 1 and HDC into every stitch. Mark your final stitch. SS to join to the beginning of your row.
Row 5. Same as 3
Rows 6-10. Continue alternating between HDC and DC, as in the rows 4 (HDC) and 3 (DC), ending with the HDC.
Row 11. SC into each stitch, marking your final stitch. You will not need to "join."
Row 12. SS into each stitch around, taking care not to make the stitches too tight. Bind off, leaving a tail, pull tight and sew in the tail.
Tighten the tail from the slip knot where you began and sew in the tail.
Your finished product should be about 18" flat, 36" around, and about 7" tall.
* 1 skein refers to the solid color ball with 277 yards of yarn - other styles of Impeccable have fewer yards of yarn. If you us a different yarn you might need more than one skein (i.e. Vanna's Choice is only 145 yds., so you would need two skeins). UPDATE: I just made a cowl with Caron Simply Soft and I LOVE IT - it has such a nice weight to it, and the yarn is set up for pulling from the outside and the inside for convenience. It also has more yardage than Impeccable, so you can make the cowl a bit taller if you like. For a stitch marker I typically use a paperclip, but in the pictures above I just used a strand from the tail. You can use a piece of yarn in a different color, a safety pin... whatever you have.
You could also make this 60"+ so that you can wrap it twice. And you might want to try stacking stitches rather than doing every-other, or throw in some single-crochets, or maybe even the treble stitch. Have fun with it!
If you have any questions regarding the pattern, please leave a comment or send me an email at TheMadeWithLoveProject {at} gmail {dot} com.
If you try this pattern I would love to see the pictures! Tag me on Instagram or share a link in the comments. Thanks!
Enjoy!
Tuesday, October 30, 2012
Tutorial Tuesday: beanies for breast cancer
Hello!
I know that I promised an original knit hat pattern, but alas, I am in the process of moving and writing a ton of papers, so it will have to wait until November. But I do have a cute hat pattern from the blog Grow Creative for you (make sure to check out the rest of her blog)!
It is a lovely shell-pattern that is not too difficult to manage, even for a beginner. I wouldn't suggest this for a first project, but if you have done a project in the round and/or know how to do a double crochet stitch, you can manage this! I say this because I am a beginner and mine is coming along just fine! But, if you find that the shells are too challenging, you can go ahead and finish it off with double-crochet stitches.
You can find the pattern right here. I am sure she would love to know if you try it out, and I know I would love to hear about it too!
Here are a couple pictures of my progress, and some notes to help you through the shell stitches if this is your first try (I will apologize now for the varying color quality - these were all taken with my phone, some at night with nasty CFL lighting, and some during the day with natural light...)
So, here is just the double crochet bit - this part is fairly easy, the only thing that might be confusing for a beginner is the joining of the stitches at the end of the round.
A note on the first round of shells: I ended up starting them in too close to my beginning chain, so if I were you, I would do what I did after I had to take all of my stitches out - count through your stitches the same way you will be putting the stitches in, i.e. one, two, five, one, two, one, one, two, five, etc... so that you can see where you will end. It will save you from possible frustration.
Here is a close-up of putting in the second row of shells.
At first I was concerned that it would be really difficult to put in the next round, but you are really just stacking the rows, with the short in-between stitches on top of a shell and the shells over the in-between stitches. You almost don't need to count...
That is as far as I have made it through the pattern so far, but I will update the post once I am finished.
And finally, some notes on my materials:
I used a metal Boyle hook in the recommended size, 5mm (I prefer metal to plastic).
I used Vanna's Choice yarn in pink. This yarn tends to split a little, which can slow things down, but I do love the colors they offer...
Well, that is all that I have to say about this project/pattern.
Hope you enjoy this lovely pattern!
Stephanie
MWLP
I know that I promised an original knit hat pattern, but alas, I am in the process of moving and writing a ton of papers, so it will have to wait until November. But I do have a cute hat pattern from the blog Grow Creative for you (make sure to check out the rest of her blog)!
| Photo from GrowCreative.blogspot.com |
It is a lovely shell-pattern that is not too difficult to manage, even for a beginner. I wouldn't suggest this for a first project, but if you have done a project in the round and/or know how to do a double crochet stitch, you can manage this! I say this because I am a beginner and mine is coming along just fine! But, if you find that the shells are too challenging, you can go ahead and finish it off with double-crochet stitches.
You can find the pattern right here. I am sure she would love to know if you try it out, and I know I would love to hear about it too!
Here are a couple pictures of my progress, and some notes to help you through the shell stitches if this is your first try (I will apologize now for the varying color quality - these were all taken with my phone, some at night with nasty CFL lighting, and some during the day with natural light...)
So, here is just the double crochet bit - this part is fairly easy, the only thing that might be confusing for a beginner is the joining of the stitches at the end of the round.
A note on the first round of shells: I ended up starting them in too close to my beginning chain, so if I were you, I would do what I did after I had to take all of my stitches out - count through your stitches the same way you will be putting the stitches in, i.e. one, two, five, one, two, one, one, two, five, etc... so that you can see where you will end. It will save you from possible frustration.
| first round of shells |
Here is a close-up of putting in the second row of shells.
| beginning of second round of shells |
| two rows of shells |
That is as far as I have made it through the pattern so far, but I will update the post once I am finished.
And finally, some notes on my materials:
I used a metal Boyle hook in the recommended size, 5mm (I prefer metal to plastic).
I used Vanna's Choice yarn in pink. This yarn tends to split a little, which can slow things down, but I do love the colors they offer...
Well, that is all that I have to say about this project/pattern.
Hope you enjoy this lovely pattern!
Stephanie
MWLP
Tuesday, October 23, 2012
Tutorial Tuesday: Beanies for Breast Cancer
Hello! So sorry I missed last week - it was a pretty hectic week between midterms and apartment hunting...
Anyway, this week I am bringing you a link for a video tutorial, as well as a link to the written pattern. This is for a basic beanie done in the half-double crochet, and it can be adjusted to any size head and any yarn (or, "wool," as Clare calls it). Clare offers nice clear instruction that is easy to follow.
Here is the link for the video.
And here is the link for the written instructions.
If you are concerned about having the right size, you can go here for a sizing chart.
Now, for the beanie pattern that I am working on: I have not started just yet... I need to get some double pointed needles in the right size. The last time I went to the craft store they didn't have the size I needed in stock, so I need to go back or find a yarn shop. But, since next week is the final Tuesday in October, I will do my best to have it for you!
Happy crafting!
Anyway, this week I am bringing you a link for a video tutorial, as well as a link to the written pattern. This is for a basic beanie done in the half-double crochet, and it can be adjusted to any size head and any yarn (or, "wool," as Clare calls it). Clare offers nice clear instruction that is easy to follow.
![]() |
| Photo from claresaddictedtoyarn.blogspot.com |
Here is the link for the video.
And here is the link for the written instructions.
If you are concerned about having the right size, you can go here for a sizing chart.
Now, for the beanie pattern that I am working on: I have not started just yet... I need to get some double pointed needles in the right size. The last time I went to the craft store they didn't have the size I needed in stock, so I need to go back or find a yarn shop. But, since next week is the final Tuesday in October, I will do my best to have it for you!
Happy crafting!
Tuesday, October 9, 2012
Tutorial Tuesday: Beanies for Breast Cancer
I am sorry to say I do not have my own pattern for you yet... It has been a hectic week and I still need to buy the right needles.
But I do have another slouchy pattern for you! This one is from Lion Brand Yarn and seems like a nice simple project, all in knit stitch. I love slouchy beanies - probably because I look terrible in the tight ones - and they are pretty popular right now, and this one just looks so cozy!
Hopefully I will be able to get those needles today and have the pattern up in a week or two.
Take care!
![]() |
| picture credit Lion Brand Yarn, lion brand.com |
But I do have another slouchy pattern for you! This one is from Lion Brand Yarn and seems like a nice simple project, all in knit stitch. I love slouchy beanies - probably because I look terrible in the tight ones - and they are pretty popular right now, and this one just looks so cozy!
Hopefully I will be able to get those needles today and have the pattern up in a week or two.
Take care!
Tuesday, October 2, 2012
Tutorial Tuesday: Beanies and Breast Cancer
As many of you know, October is Breast Cancer Awareness month, and as someone whose family has been touched by the decease, I thought it would be appropriate to encourage all of you to make a beanie for a breast cancer patient this month.
There are lots of patterns out there, so I will feature a new one each week, but if you want to look ahead I have pinned a few of both knit and crochet patterns.
This one is a favorite of mine!
![]() |
| Photo from AllAboutAmi.tumblr.com |
I haven't tried it yet, but I hope to really soon - it's such a cute slouchy beanie pattern! I found it through All About Ami, which is the lovely blog that inspired me to start crocheting (she has a ton of cute amigurumi patterns)!
After looking at a bunch of patterns, I am going to try my hand at my own knit pattern using some pink yarn that I have. I will try to keep track of what I do so that if it works out I can share the pattern here.
Happy crafting!
P.S. Can you believe it is already October?!
Tuesday, September 25, 2012
Tutorial Tuesday: Crochet Kitty
Meet Priscilla! She is my first amigurumi, and my first completed crochet project. I think this makes her perfect for this week's Tutorial Tuesday.
I found the pattern a while back on Bethsco Blog, and have been meaning to try my hand at it. Her directions are clear and easy to follow, so that a beginner like me had an easy time of it (thanks Bethsco!). The only part that was a little frustrating was attaching the pieces. I wasn't really sure how to go about it, so I did the best that I could. I probably should have looked up a YouTube tutorial, but it all worked out.
Amigurumi, or knitted/crocheted stuffed animals, are really fun to make - it's easy to get hooked (wow, a lot of puns today)! It's pretty exciting watching everything come together, piece by piece, and finally having a cute little guy that you made!
These would make great gifts, and would be a wonderful thing to donate to family shelters, etc., especially with the holidays coming up (just make sure the place you are donating to takes hand-made gifts - some places require new, store-bought toys)!
Can't wait to finish my next amigurumi!
Happy crafting!
(P.S. Priscilla was made with Vanna's Choice yarn in Dusty Grey-Brown, with a size G hook)
Tuesday, September 11, 2012
Tutorial Tuesday: Knit and Crochet
For the very first Tutorial Tuesday I have decided to post links to tutorials on how to knit and crochet. Below are links for written and video tutorials that I have used to learn how to knit and crochet. I really love the videos on how to crochet - they are well done and easy to follow.
And here is the link for the video of how to crochet.
Knitting in simple rows of the garter stitch can be very therapeutic and meditative, and makes a nice simple scarf or headband. If you want something a little more involved, crocheting in the round is also easy enough for beginners, but requires a bit more focus, and can be used to create hats.
As for materials, I love bamboo knitting needles and metal crochet hooks. When choosing a yarn, there are a lot of really fun yarns that hide mistakes well, but they can also make it difficult to see your stitches and know that you are working the yarn correctly. So if you must have the fun yarn, get some simple yarn as well to begin your practice, so that you are familiar with what the stitches are supposed to look like.
Before you buy materials, check your local craft stores' website to see if they have coupons discounting full price items, and also check to see if they are having a sale on yarn.
Enjoy!
Labels:
charity,
crochet,
Knit,
tutorial,
tutorial tuesday
Subscribe to:
Posts (Atom)